I run Coolify on Hetzner to self(ish)-host all my side projects, toys and any other bits I want to put online. About a week ago I got hacked and posted about it on Hacker News. The post went viral and I got around 30k blog views over a week (normally I’d get maybe 10).
Overall, the reaction was incredibly positive and I had several people go into my git commits to find my email and tell me that reading the article had made them realise that they too were compromised.
What a coincidence. I also received a similar email and upon investigating, found the same Monero mining on my server.
TY for the article. You made me look into my server, and also found some strange activity on my docker containers. Good call!
Additionally, in between some standard HN snark, there were some golden nuggets of good practice when running this kind of set-up. There were also a bunch of people telling me to rebuild my server because it was probably tainted.
This article aims to kill two birds with one stone, I’ve just bought another server to build from scratch. I’m going to recreate my server and document the whole process here. The idea is to make this a sort of definitive guide to self-hosting using Coolify on Hetzner. So buckle up. It won’t be anywhere near as exciting as me getting hacked, but hopefully it’ll help people out a bit.
DISCLAIMER 1: I am not a security or devops expert. I am a backend developer who’s been around a bit. I’m taking the best bits of advice I received and putting them here. It will be wrong in some way. Email me and I’ll update it, don’t jump down my throat.
DISCLAIMER 2: I’m going to try to toe the line here between secure and useable. The aim is to secure my side project / fledgling SaaS / personal blog / whatever. If you’re handling medical records go and hire someone who knows what they’re doing.
Let’s get started!
Step 1: Go Get Your Box
There are two general options here:
- A dedicated server. This is an actual server in a rack with an internet connection. The cheapest on is an AX41-NVMe which comes with 6 cores, 64GB of RAM and 2 x 512GB NVMe SSD’s which honestly is fucking insane for what we’re doing. You’ll barely touch the sides for self-hosting / hobbyist use.
- A VPS. I’m less familiar with Hetzners offering here but the general idea with most providers is you gat a logically seperated section of one of the dedicated boxes above.
Essentially, Coolify is going to allow us to split our server / VPS into sections and give those sections to different programs we want to run. A VPS is Hetzner splitting a server up into sections and giving those sections to different customers.
For this tutorial, we’re going to use a dedicated server, because it’s only 40EUR per month and I think having my own server makes me cool.
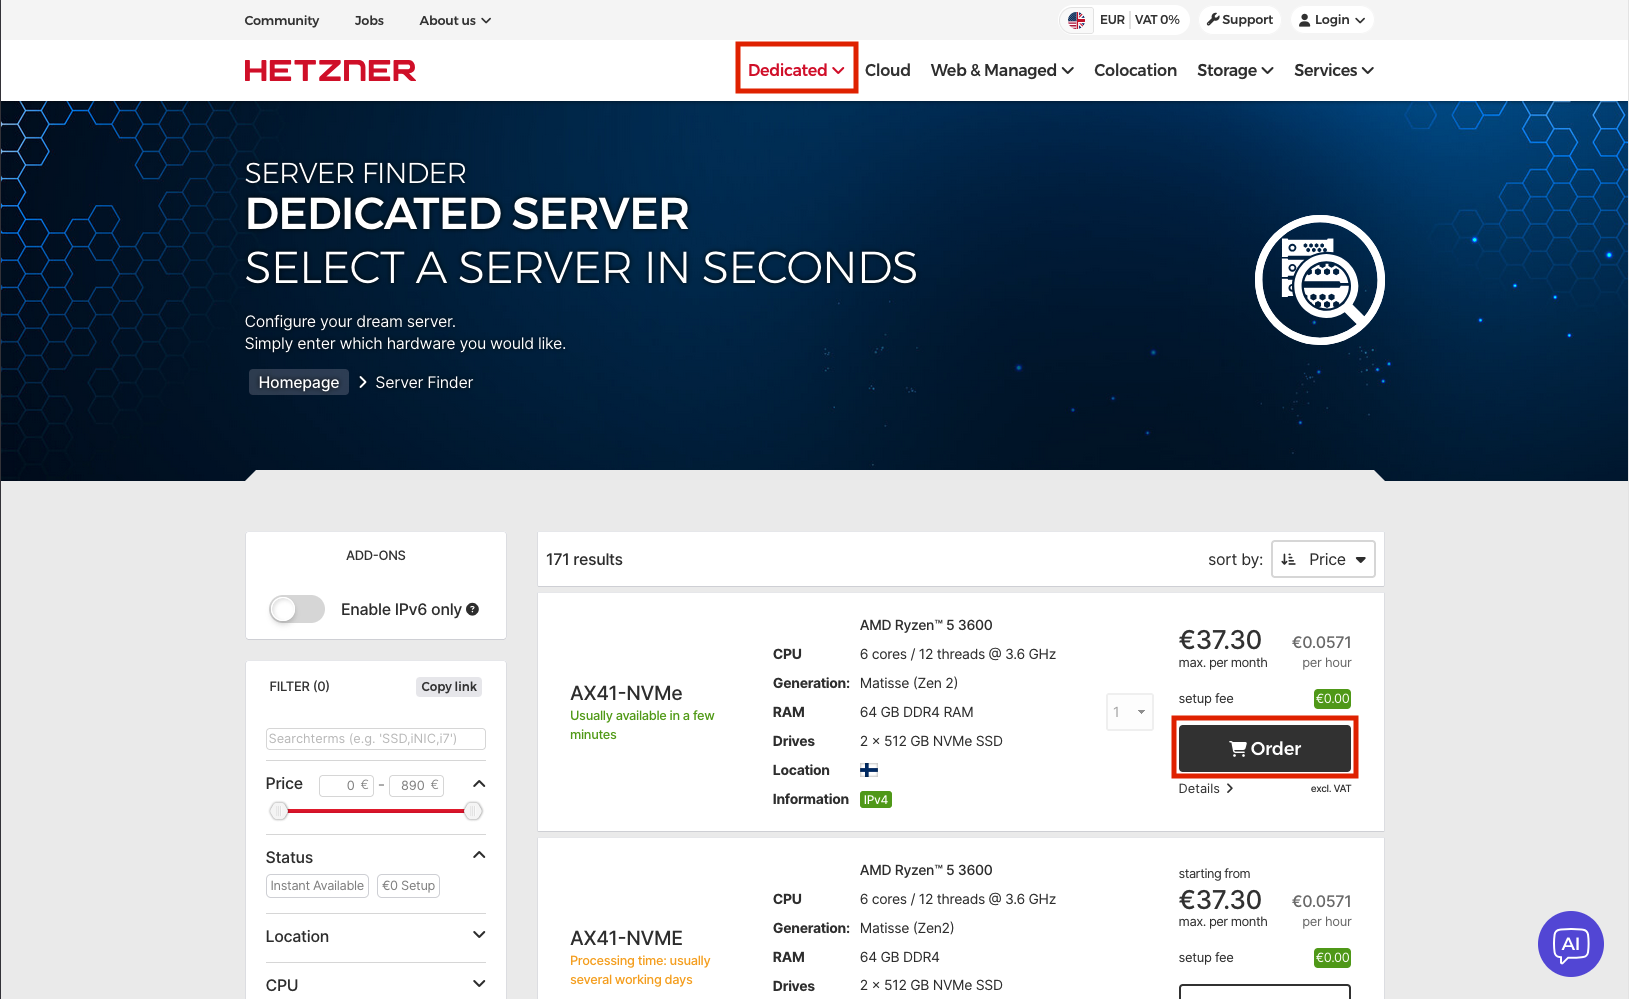
Go to the Hetzner site. Click on dedicated then go to ‘Server Finder’. Grab yourself an AX41-NVMe or whatever the
cheapest one is that says Usually available in a few minutes.
On the next page, the important bit is the section at the bottom.
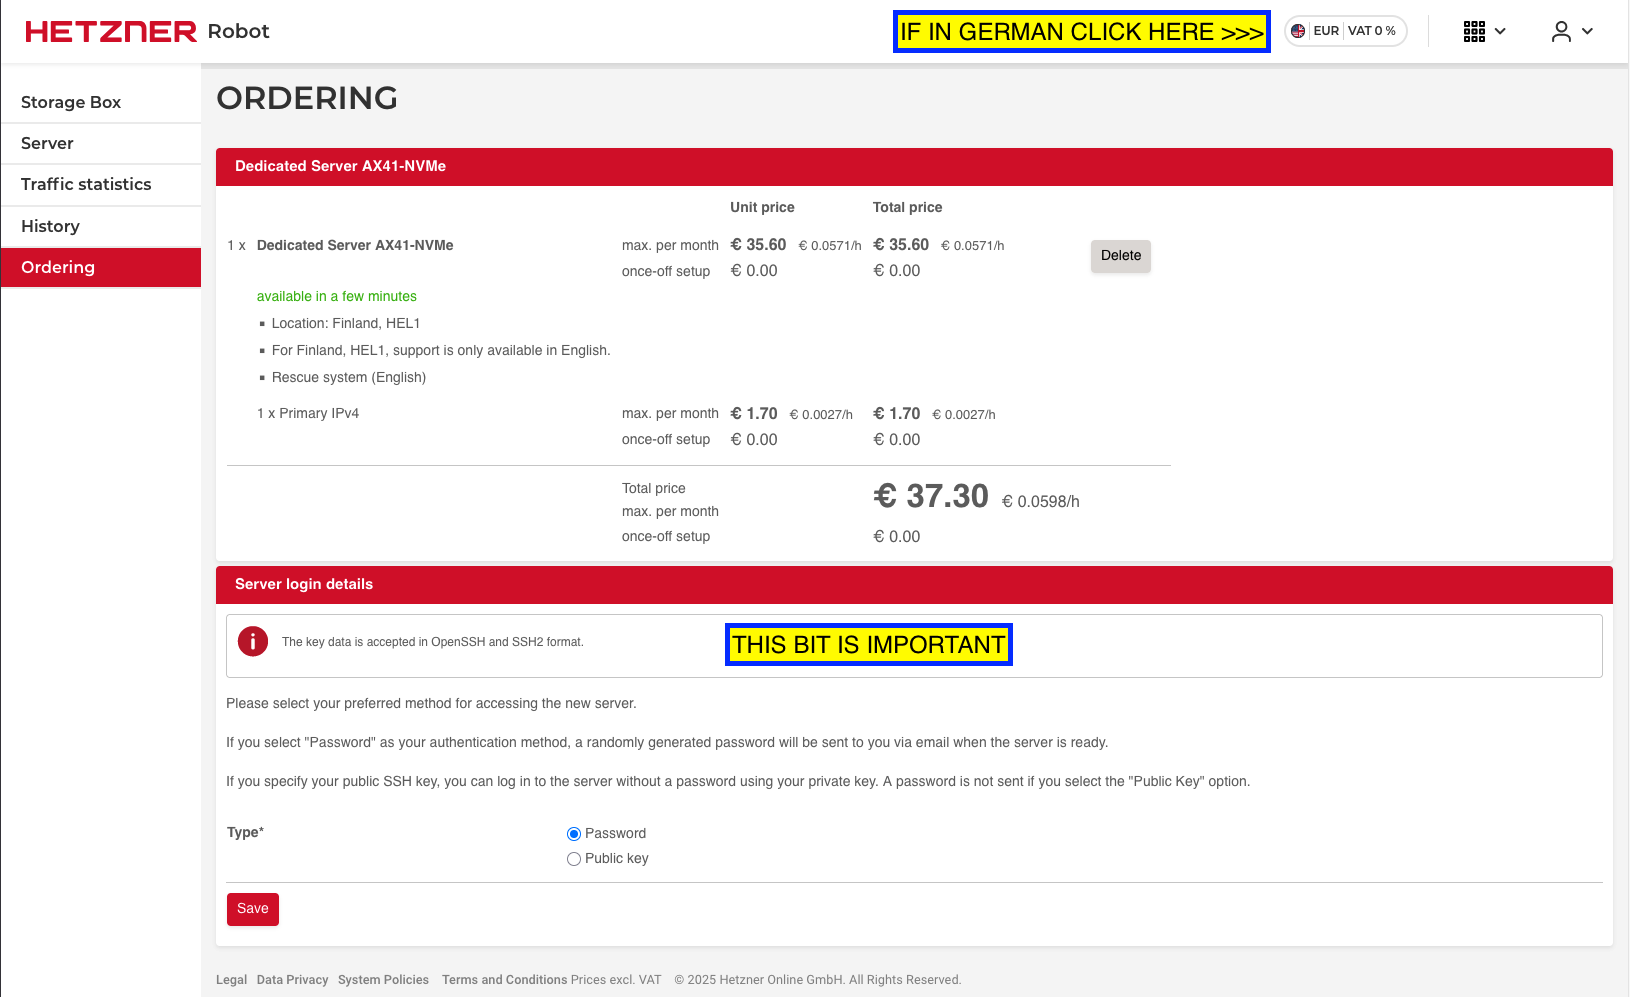
DO NOT JUST USE PASSWORD AUTH FOR SSH! There are bots on the internet that will spend the next million years hitting your server with SSH requests and trying passwords. Given enough time, they’ll get it.
Let’s configure SSH using our public key. You more than likely already have a public SSH key. Try this in a terminal locally:
cat ~/.ssh/id_ed25519.pub

# Or if you're still using an RSA key.
cat ~/.ssh/id_rsa.pub
If you don’t yet have an SSH key, do the following:
ssh-keygen -t ed25519 -C "your_email@example.com"
cat ~/.ssh/id_ed25519.pub
Now, back in the browser:
- Select the
Public keyoption. - Paste in your public SSH key.
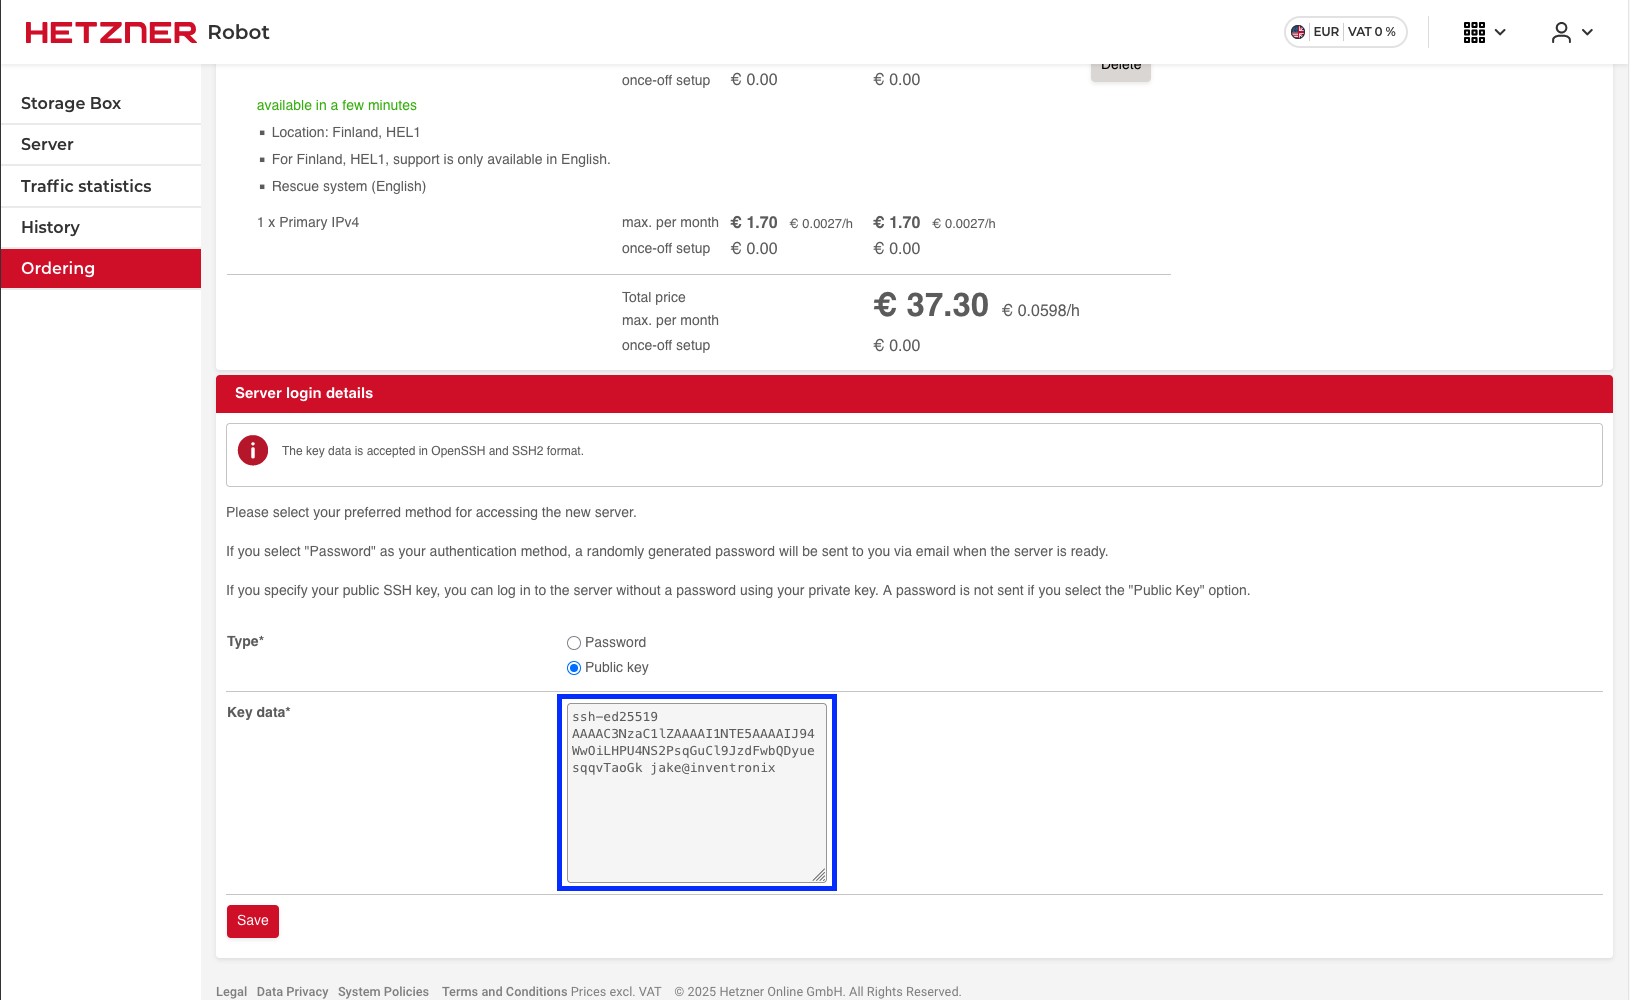
Press the save button and then go through the billing process etc and eventually you’ll get to a confirmation screen where they well you they’ll email you when your server is ready.
The email will come through and look like the one below. Exciting!
Dear Mr Jake Saunders

Thank you for your order BLA BLA BLA from 22/12/2025 21:35 CET.

Login Details

Your server AX41-NVMe #123456 (123.123.123.122, 2a02:5f9:8b:496d::/64) has been activated and is now ready for use.
Currently it is booted in the Rescue System. You can access the server via SSH2 using the following details:

IPv4 Address:	123.123.123.122
IPv6 Address:	2a02:5f9:8b:496d::2
Username:	root
Password:	Lol what do you mean password?
Host key:	Some keys.....
I made a mistake when buying my server. I ordered my shiny new server with password auth set not SSH. I’m willing to bet I’m not the only one. Don’t worry about it, it’ll be fine for half an hour while we get stuff booted up. I’ll show you how to fix it later.
Installing an Image
For now, let’s get an image installed. First, SSH into your new server. On your local machine:
ssh root@<YOUR_IP_FROM_THE_EMAIL>
Then you get:
ED25519 key fingerprint is SHA256:some_key.
This key is not known by any other names.
Are you sure you want to continue connecting (yes/no/[fingerprint])?
All good, yes. Enter the password from the email if you didn’t set up public key auth.
You get this screen:
  Welcome to the Hetzner Rescue System.

  <other stuff>

Network data:
   eth0  LINK: yes
         MAC:  a8:a1:59:0f:31:ae
         IP:   95.217.229.112
         IPv6: 2a01:4f9:4b:396d::2/64
         Intel(R) Gigabit Ethernet Network Driver
Look at dem juicy specs baby! You can fit so many blogs in this bad boy.
Next, type in installImage into the shell.
installimage
You’ll get this pretty sweet looking screen. Which Os you install is up to you. I’m going to install Ubuntu because it’s what I’m used to.
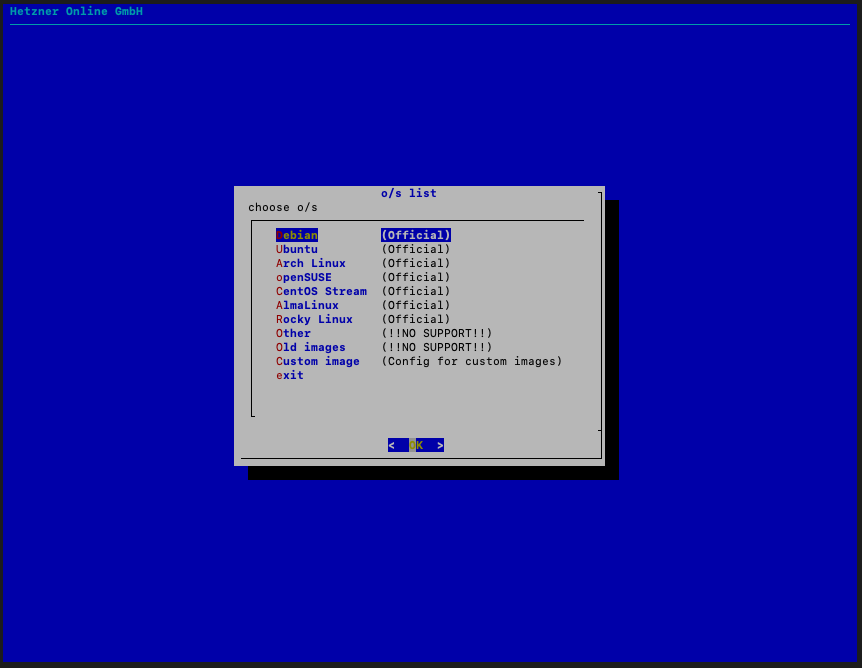
Select the latest version (24.04 Noble at time of writing).
You’ll get a screen saying ‘An editor will now show you the config for this image.’ Press enter.
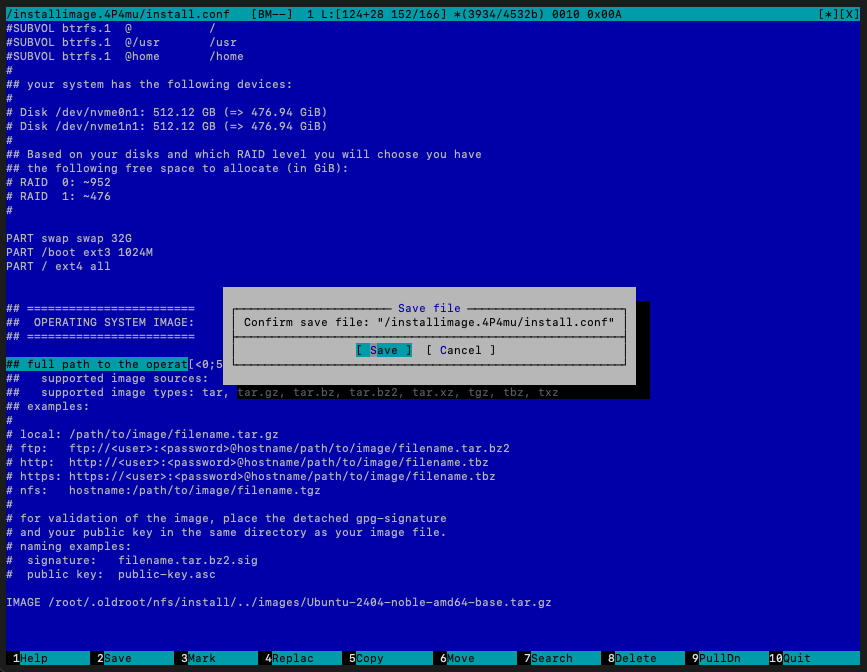
Next you’ll see a text editor, there are a few things to change / check here:
- HOSTNAME - Set this to something useful / that you’ll remember.
- SWRAID - This is software RAID (RAID 1), which means the system will make each of your drives redundant. This is good. Leave it.
- PARTIONING - The default is fine, leave it.
IMPORTANT: F2 to save (Fn and 2) on a mac. This took me longer to figure out than it had any right to. Don’t laugh at me.
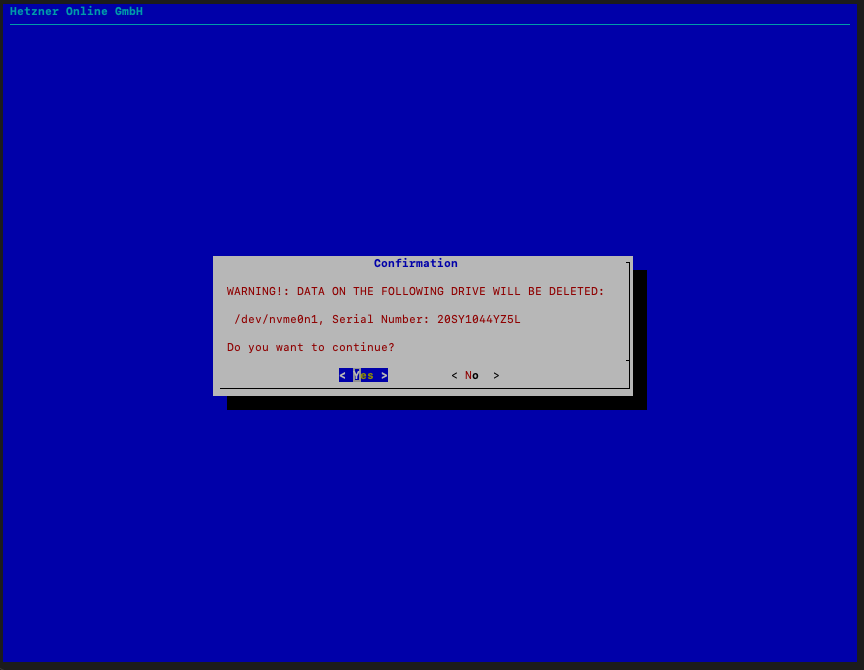
Press F10 to exit. Then you get this very scary looking message. It’s fine, it’s blank anyways.
Let it do it’s thing. Eventually you’ll get:
                  INSTALLATION COMPLETE
   You can now reboot and log in to your new system with the
 same credentials that you used to log into the rescue system.
- Type
rebootand press enter. - You’ll get a connection closed error.
- Type
ssh root@YOUR_SERVER_IPagain.
You’ll get this error message:
@@@@@@@@@@@@@@@@@@@@@@@@@@@@@@@@@@@@@@@@@@@@@@@@@@@@@@@@@@@
@    WARNING: REMOTE HOST IDENTIFICATION HAS CHANGED!     @
@@@@@@@@@@@@@@@@@@@@@@@@@@@@@@@@@@@@@@@@@@@@@@@@@@@@@@@@@@@
IT IS POSSIBLE THAT SOMEONE IS DOING SOMETHING NASTY!
Someone could be eavesdropping on you right now (man-in-the-middle attack)!
It is also possible that a host key has just been changed.
The fingerprint for the ED25519 key sent by the remote host is
SHA256:b/some_key.
Please contact your system administrator.
Add correct host key in /Users/jakesaunders/.ssh/known_hosts to get rid of this message.
Offending RSA key in /Users/jakesaunders/.ssh/known_hosts:49
Host key for 123.123.123.123 has changed and you have requested strict checking.
Host key verification failed.
Spooky stuff. It’s fine though. This basically means your computer remembers a computer with a different public key at this address. Which makes sense, you’ve just installed a new OS.
Remove the old key with:
ssh-keygen -R YOUR_SERVER_IP
Then try to SSH in again and you’ll get the old Are you sure you want to continue connecting warning. Type yes,
enter your password if you need to and you should see:
Welcome to Ubuntu 24.04.3 LTS (GNU/Linux 6.8.0-85-generic x86_64)

 * Documentation:  https://help.ubuntu.com
 * Management:     https://landscape.canonical.com
 * Support:        https://ubuntu.com/pro

 System information as of Mon Dec 22 11:09:20 PM CET 2025

  System load:              1.05
  Usage of /:               0.4% of 435.77GB
  Memory usage:             1%
  Swap usage:               0%
  Temperature:              53.0 C
  Processes:                241
  Users logged in:          0


Expanded Security Maintenance for Applications is not enabled.

0 updates can be applied immediately.

Enable ESM Apps to receive additional future security updates.
See https://ubuntu.com/esm or run: sudo pro status

The list of available updates is more than a week old.
To check for new updates run: sudo apt update
We’re in baby!
Disabling SSH Password Authentication (If you need to)
If you set up SSH auth on your server in the Hetzner console, skip this bit.
Next, let’s go back and enable SSH key auth and disable password auth.
WARNING: If you do this wrong you’ll lock yourself out of the server. Not a big deal, you can recover it, but pay attention.
On your local machine (Mac/Linux):
# If you already have an SSH key
cat ~/.ssh/id_ed25519.pub

# If you don't have one yet, generate it
ssh-keygen -t ed25519 -C "your_email@example.com"
ssh-add ~/.ssh/id_ed25519
# Then run the cat command above
Copy the entire output. It’ll look something like:
ssh-ed25519 AAAAC3NzaC1lZDI1NTE5AAAAIJl3dIeudNqd0DPMRD6OIh65tjJxJ8R0eQU7F+gZ8N5 your_email@example.com
On your server:
mkdir -p ~/.ssh

# Add your public key
echo <PASTE YOUR KEY HERE> >> ~/.ssh/authorized_keys

# Set proper permissions (important!)
chmod 700 ~/.ssh
chmod 600 ~/.ssh/authorized_keys
DO NOT CLOSE THIS TERMINAL WINDOW! Open a new one, and type in:
ssh root@YOUR_SERVER_IP
It should let you straight in, no questions asked (unless you set a password on your SSH key).
DO NOT CONTINUE UNTIL YOU HAVE SUCCESSFULLY LOGGED IN WITHOUT THE OLD SERVER PASSWORD.
Next, we’re going to disable the old password auth.
nano /etc/ssh/sshd_config
Find and change these lines (or add them if they don’t exist). You might have to uncomment them (remove the #):
PasswordAuthentication no
PermitRootLogin prohibit-password
PubkeyAuthentication yes
CTRL+X, Y then Enter to save and exit.
Restart SSH:
systemctl restart ssh    # Ubuntu
systemctl restart sshd   # Other things, try both.
Finally, test one more time. Close your terminal and reconnect to SSH, it should let you in no questions asked.
Setting up the Firewall
The next thing we need to do is set up the firewall. The rationale here is that we’re going to use Coolify, which in turn uses Traefik as a reverse proxy. We want all incoming traffic to go through the reverse proxy. For this reason we’re going to block incoming traffic on any ports other than:
- 22 (SSH)
- 80 (HTTP)
- 443 (HTTPS)
This means we can more safely spin stuff up inside the server and open up ports to the host machine, knowing that they can’t be accessed from the outside world. Later, we’ll use Tailscale to set up a VPN. This means you’ll be able to pretend you’re in the box and directly connect to postgres on 5432 and what have you.
WARNING: Do not try to use ufw for setting firewall rules. Docker overrides them because docker does what it wants.
We’re going to use firewalld.
Install firewalld:
apt update
apt install firewalld -y
systemctl enable --now firewalld
Set up the rules:
# Default deny all incoming
firewall-cmd --set-default-zone=public

# Add your services to public
firewall-cmd --permanent --add-service=ssh
firewall-cmd --permanent --add-service=https
firewall-cmd --permanent --add-port=80/tcp

# Reload
firewall-cmd --reload
Check it worked:
firewall-cmd --list-all
You should see SSH, HTTPS, and port 80 in the output.
Stop Docker Bypassing the Firewall
This is the important bit. We need to stop docker from being able to bypass the firewall rules.
Edit the firewalld config:
nano /etc/firewalld/firewalld.conf
Find the line #StrictForwardPorts= (or add it, it wasn’t there for me) and change it to :
StrictForwardPorts=yes
Save (Ctrl+X, Y, Enter) and reload:
firewall-cmd --reload
systemctl restart firewalld
Now Docker can’t just open whatever ports it wants without your permission.
Setting Up Hetzner’s Cloud Firewall
Defense in depth. Even if you fuck up the firewall on your server, Hetzner’s firewall sits outside and can save you.
Log into the Hetzner Robot panel (https://robot.hetzner.com), find your server, and set up a firewall to only allow:
- Port 22 (SSH)
- Port 80 (HTTP)
- Port 443 (HTTPS)
The quickest way to do this is to just use the Webserver firewall template. Select it and press apply.
Testing your firewall
To quickly test your firewall, start up a little HTTP server on port 8080:
# On your server
python3 -m http.server 8080
Then locally:
curl http://YOUR_SERVER_IP:8080

# you'll get
curl: (52) Empty reply from server
Then do the same, but move it to port 80
# On the server
python3 -m http.server 80

# On your machine
curl http://YOUR_SERVER_IP:80

# You'll get:
<!DOCTYPE HTML>
<html lang="en">
<head>
<meta charset="utf-8">
<title>Directory listing for /</title>
</head>
<body>
<h1>Directory listing for /</h1>
<hr>
<ul>
<li><a href=".bash_history">.bash_history</a></li>
<li><a href=".bashrc">.bashrc</a></li>
<li><a href=".cache/">.cache/</a></li>
<li><a href=".cloud-locale-test.skip">.cloud-locale-test.skip</a></li>
<li><a href=".local/">.local/</a></li>
<li><a href=".profile">.profile</a></li>
<li><a href=".ssh/">.ssh/</a></li>
</ul>
<hr>
</body>
</html>
Configuring Tailscale
The next thing we’re going to do is set up Tailscale. Tailscale creates a private mesh network between your devices. This will allow you (and hopefully only you) to access the layer of ‘internal services’.
This means when you deploy a Postgres database (or any other service) in Coolify, you might want to connect to it directly from your laptop using a tool like TablePlus or psql. But we’ve just locked down our firewall to only allow ports 22, 80, and 443. We don’t want to open port 5432 (Postgres) to the entire internet.
With Tailscale installed on both your server and your laptop, your server gets a private Tailscale IP
(something like 100.64.1.5). When you’re connected to Tailscale, you can access services directly via this private IP.
To start, install Tailscale on your server:
curl -fsSL https://tailscale.com/install.sh | sh

tailscale up
You’ll have to sign up with SSO here. Which annoys the shit out of me. Let me use a username and generated password. SSO is not inherently more secure you’re just concentrating around a single point of failure, and now I’m dependent on Google.
/rant
Next, get your tailscale IP. Note this down for later.
tailscale ip
Install Tailscale on your local machine
You’ll need a tailscale client on your local machine too. The easies way is to go get the app from https://tailscale.com/download/mac
You’ll have to allow an extension, start the VPN and log in here.
WARNING: My internet totally disconnected here. Turns out I had another VPN (Nord) running at the same time and my Mac did not like this. Only connect to one VPN at once.
Installing Coolify
I’m not going to go into depth on installing and configuring Coolify. Their docs are the place to go here.
curl -fsSL https://cdn.coollabs.io/coolify/install.sh | sudo bash
Then let it do it’s thing.
You should get a big congratulations message and a link to your-ip:8000 to perform initial setup.
   ____                            _         _       _   _                 _
  / ___|___  _ __   __ _ _ __ __ _| |_ _   _| | __ _| |_(_) ___  _ __  ___| |
 | |   / _ \| '_ \ / _` | '__/ _` | __| | | | |/ _` | __| |/ _ \| '_ \/ __| |
 | |__| (_) | | | | (_| | | | (_| | |_| |_| | | (_| | |_| | (_) | | | \__ \_|
  \____\___/|_| |_|\__, |_|  \__,_|\__|\__,_|_|\__,_|\__|_|\___/|_| |_|___(_)
                   |___/


Your instance is ready to use!

You can access Coolify through your Public IPV4: http://94.237.229.112:8000
You can’t actually access this address from your machine, because our firewall is doing it’s job! In order to access Coolify, substitute the servers public IP address for your Tailscale IP from the previous step.
https://YOUR_SERVERS_TAILSCALE_IP:8000
Making Coolify Public
This really annoys me, and I can’t see an easy way around it.
One of the best features of Coolify is to have automated deployments on private GitHub repos. But to do this you need to install a GitHub application. Coolify makes this easy, but it requires you to make the Coolify dashboard public so it can receive a callback and webhooks when you push to GH.
Ideally, we’d want to make the Coolify dashboard only accessible via Tailscale because it’s basically your AWS console, giving any would-be attackers admin over your whole server.
I think we might be able to get around this by creating a simple Go service which just eats webhooks and forwards them to Coolify internally, but I need to invest some time into making this work.
For now, head over to Settings in your Coolify dashboard and give your server a domain. At least this way you get https rather than exposing port 8000. You’ll need an A record from one of your domains.
So Where Are We Now?
You’ve got:
- ✅ A hardened server with SSH key auth only
- ✅ firewalld blocking unwanted ports (and Docker can’t bypass it)
- ✅ Hetzner’s external firewall as backup
- ✅ Tailscale VPN for secure access to internal services
- ✅ Coolify installed and PUBLICLY ACCESSIBLE (To fix later).
Which means that all oncoming access to your server is through either:
- SSH, but only with your SSH key.
- Your reverse proxy, which means only HTTP traffic routed where you want it.
What’s next:
- Set up your first service in Coolify
- Configure S3 backups for Postgres
- Set up monitoring/alerts
General Docker Security Principles
Now you’ve got Coolify running, what you deploy is up to you. It’s tricky to provide specific advice beyond this point but here are the principles that would’ve saved my arse when I got hacked:
Port Binding - Never 8080:8080, always 127.0.0.1:8080:8080 or your Tailscale IP. If it doesn’t need public
access, don’t give it public access.
Resource Limits - Set CPU and memory limits on every container. A rogue process can’t eat your whole box:
cpus: 0.5
mem_limit: 512m
Rootless Containers - Run as non-root user inside containers where possible. Coolify handles this for most things, but check if you’re deploying custom containers.
Keep Shit Updated - I got hacked because Umami was running a vulnerable version of Next.js. Enable auto-updates or check regularly.
Monitor Your Box - I only noticed the hack because my server was chewing CPU. Set up basic monitoring for CPU/memory/network spikes. A simple cron script that emails you when load average > 4 would’ve caught it.
Backup Everything - S3 backups are cheap and Coolify automates them. Hopefully this is obvious but back them up somewhere which is NOT your server. I personally use DigitalOcean Spaces. It’s S3 compatible storage and you get 250GB and a free CDN for like $5 per month, which is good value IMO. Incidentally S3 is the only thing I don’t self-host.
That’s it. You’re good to go. Stay safe out there.