Alright, I’ll confess to you that I’m pretty deep into this project now so writing this blog post as if this is a fresh idea I just thought of seems a little disingenuous. What i’ll do instead is talk through the basic design of Garduino and maybe a few things I learned by building stuff that didn’t work.
What the fuck is Garduino Jake?
Garduino is the name I’ve given to my new pet project. It’s a fully automated hydroponic garden designed to enable anybody to grow their own produce at home. There are a few pieces of consumer grade hardware out there that allow you to monitor your hydroponic grow and maybe report some data back to your phone or something. The key differentiator here if that Garduino is not just going to monitor, it’s actually going to respond to stimulus and control all aspects of your grow environment to keep your plants growing smoothly!
Edit: In the course of my research I found these folks who are doing a very similar thing but with a smaller subset of functionality. Pretty cool, but I think we can do better!
For example, lets say you’re growing strawberries, and you need the pH of the water to be between 6 and 7. Garduino comes equipped with a pH monitor which will constantly measure the pH of your water. If it finds it’s going out of spec, it’ll automatically use a dosing pump to add ‘pH up’ to the water until it’s back in specification. Neat right?
From my understanding (which is fairly limited right now, working on it), we’re interested in the following environmental aspects if we want our hydroponic plants to grow optimally:
- Water circulation (getting the water to the roots).
- Nutrients.
- Light.
- Air (temperature, humidity, C02, Oxygen).
- pH.
If you can get all these right, in theory your plants should grow and bear fruit. The current process people use to hydroponically grow basically requires you to constantly manually measure, monitor and correct these environmental factors to keep your grow in an optimal condition. Garduino will monitor all these factors for you and make adjustments to your setup to keep your grow on track.
Here’s a list of the core features it’s going to have:
- A full suite of sensors to measure and record all the factors above.
- Automatic control of outputs / adjustments to ensure these factors stay within spec.
- A fully featured app and web interface so you can view the status of your grow and make changes anywhere in the world.
- A rules engine, so you can create rules such as:
From week 1 to week 4 of my grow I want the lights to come on at 8am and off at 5pm.Keep my pH levels between 6 and 7.Turn the air circulator on and off every ten minutes from week 1 to week 7.My EC (electrical conductivity) levels should be between 5 and 10, if it's highet than that, add water. If it's lower than that, add more nutrients.
- A convenience function I’m calling plant profiles. So you can create sets of rules that make sense together and quickly apply them to your grow. For example, you could create one called ‘Strawberries’ which would have your settings for strawberries.
The Hardware
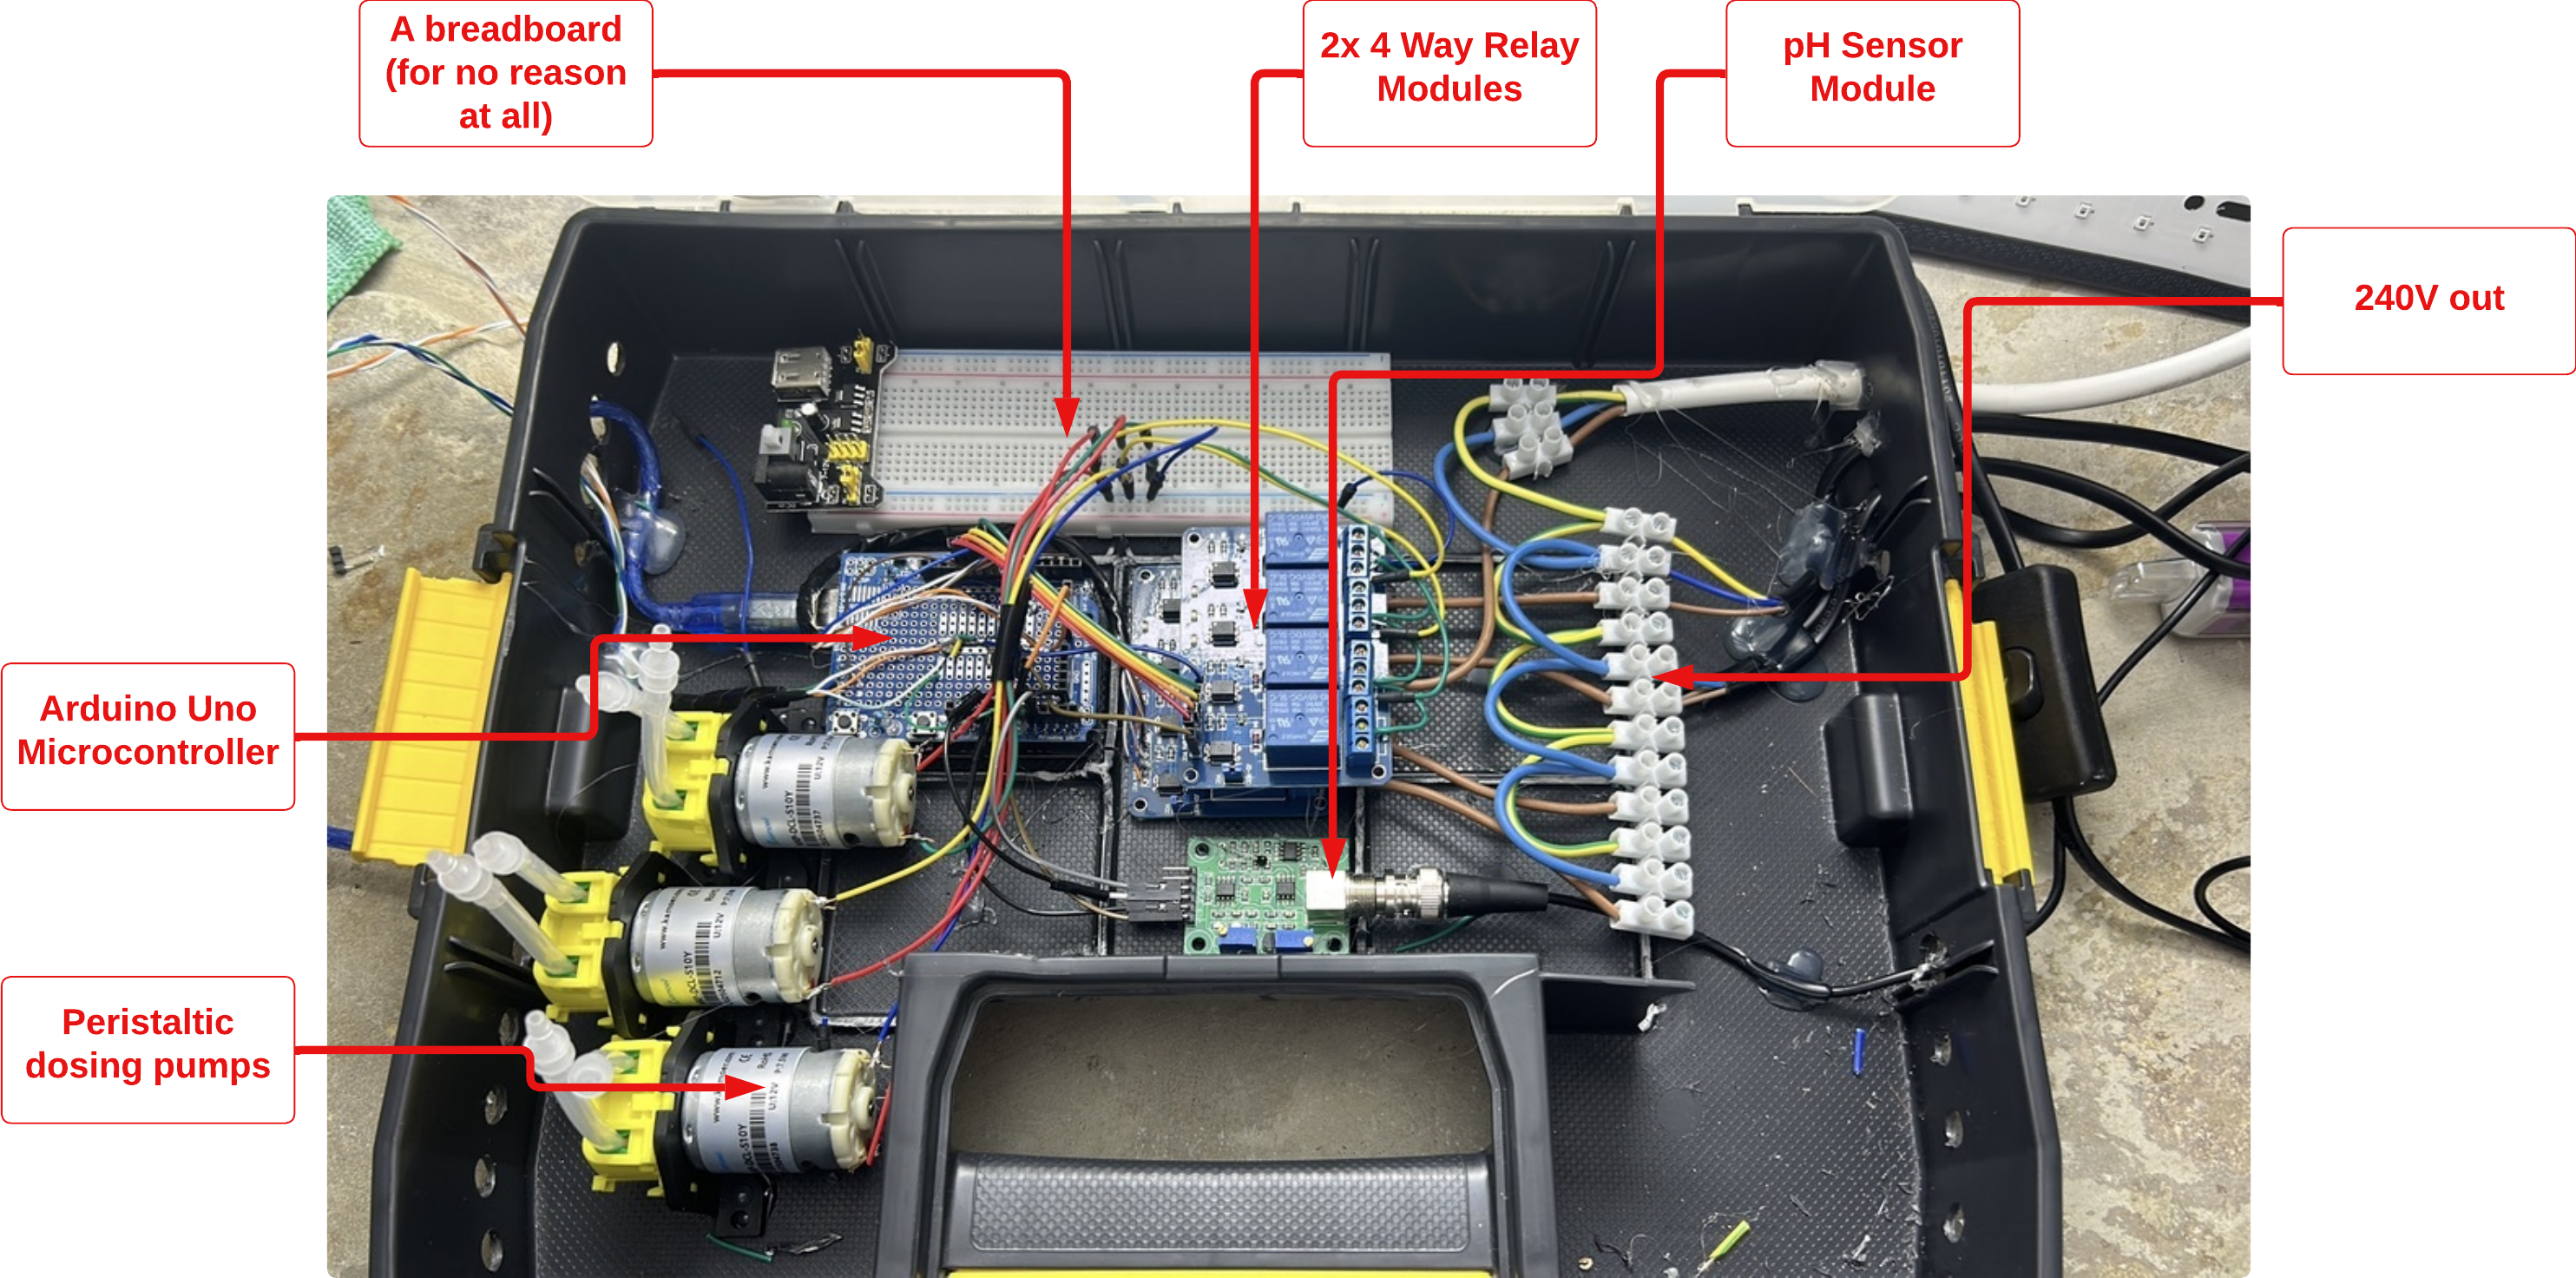
At its most basic, the hardware components of a Garduino are a bunch of bits I’ve bought off eBay / AliExpress and tied together to create a coherent system. Here’s a picture of the first very rough prototype.

Stuff Pictured Here
- Arduino Microcontroller - This will be responsible for the direct control of all the other hardware in the Garduino.
It essentially has two main jobs:
- Collect data from all the sensors and send it back to the Raspberry Pi via USB serial connection.
- Receive statuses (essentially on or off) for each of the outputs (relays) and send the status to the relay.
- Peristaltic dosing pumps - These are responsible for dosing the nutrient solution with nutrients, pH up and pH down.
- Breadboard - I put this in because I honestly thought I’d need it for resistors and such but the reality is I really don’t. Most of this stuff connects directly to the Arduino. To be removed for V2.
- Relay modules - These receive commands from the Arduino in the form of a 5V+ voltage in and use that to switch a relay. This relay then powers either a 240V or a 12V device. We need these because putting 240V straight through an Arduino is a shortcut to a fire.
- pH Sensor module - This connects to the Arduino and provides a reading for pH on demand.
Stuff not picured here
- Raspberry Pi - The Pi’s job is again, twofold:
- To communicate via the web with a cloud based service.
- Firstly, to send the sensor data and switch statuses back to a webapp / app so that they can be viewed by the user anywhere in the world.
- Secondly, to receive ’events’, these are essentially instructions telling the Garduino unit to do something at a particular date and time. For example, switch the air circulation on at 14:30pm on the 3rd of October.
- To communicate with the Arduino.
- Firstly, to receive sensor data and translate that into JSON so it can be sent to the cloud service.
- To take each ’event’ and turn that into a command at the right date and time so that the Arduino can make it happen.
- To communicate via the web with a cloud based service.
- EC Sensor - EC stands for electrical conductivity, and can also be called a total dissolved salts sensor. Pure water (or deionised water) is actually a near perfect insulator, it’s the dissolved minerals in the water which make it conductive. Nutrients in the water are required for plants to grow. Therefore, by extension, if we measure the conductivity of the water we can measure how many (much?) nutrients are in it!
- Various power supplies - We need to provide power at 5V for the Pi and Arduino, 12V for the pumps and 240V for the things we’re going to switch on and off. To make this happen there are a number of power supplies not pictured in this image.
The Software
The other side of this project is the software required to take all these dumb electronics and turn them into a coherent system capable of managing a grow over long periods of time. I’ll divide up the software into two parts and talk about them both briefly here, but I’ll go into much more detail in later posts.

Edge Computing - The Garduino Unit
The first software application(s) here are is the controls within the Garduino unit itself, both within the Arduino and the attached Raspberry Pi.
The first question people have asked is why have I bothered with both? I believe that both the Arduino and the RPi have their own strengths and weaknesses and combining the two makes for a better system altogether.
The Arduinos job is a fairly basic one, it has direct access to some sensors and can directly alter the high / low status of the relays. It’s job is to do that and only that, with very little logic in the Arduino itself.
The RPi’s job is a little more complicated. It needs to receive fairly complex event commands for each of the outputs and keep track of the date and time in order to make sure commands are carried out when they should be. In the case of ‘range events’ (i.e. keep sensor A between X and Y) It’s also responsible for actually checking the sensors and deciding which output needs to be turned on and off. It also handles the network connection back to the server which can’t be done with the Arduino alone.
The advantage of keeping these two sets of functions separate (IMO) is:
- Redundancy - The Arduino is a very simple piece of kit. It doesn’t do a lot, so you’ll struggle to break it. It’s also independently powered by its own supply as opposed to powered by the RPi via USb so if the Pi dies then it’ll happily chug away carrying out the last command it was given.
- Complexity - The Pi is great for doing complicated things which would be very tricky to do well with the Arduino:
- Networking - The Pi has WiFi and ethernet built in, and we can do things like make REST calls using Python.
- Time - The Arduino doesn’t seem to have a great grasp on the concept of time. Sure, you can time stuff like do X in 5 minutes time but the idea of ’turn this on next week at 9am’ is a little out of reach here.
- Storage - Using the Pi means we can use a nice persistent database such as SQLite to store our measurement records in case of server outage.
- Plus on the Pi we’re just writing Python or Go or whatever, which means we get nice things like unit testing and mocks and CI/CD which I’m honestly not sure we can do on the Pi.
- The possibility of OTA updates. In theory, we should be able to send an update through the Pi to update either its own software or that of the Arduino.
User Interface - Webapp / Mobile App
All the Garduino units are then going to talk to a central cloud based webapp, which the user will also interact with. This will mean that the user can see the status of their Garduino and make changes from anywhere in the world. It’s also going to allow the user to create complex sets of rules called ‘plant profiles’ governing how the grow should be handled throughout its life.
Again, I’m not going to go into too much detail here because it’s an entire blog post in itself, but the basics of the architecture are as follows:
- The app is going to be a Django based webapp (‘cos I’m a Django dev, and when you’re a hammer every problem is a nail).
- The webapp will be specifically designed for large format devices (laptop / desktop). I have a pet peeve about responsive design because it basically forces you to have a mobile interfacer stretched out for a full size desktop. This will be a full desktop experience that may not even work on a phone.
- To compliment this approach, there’s going to be a specifically designed mobile app (built in flutter).
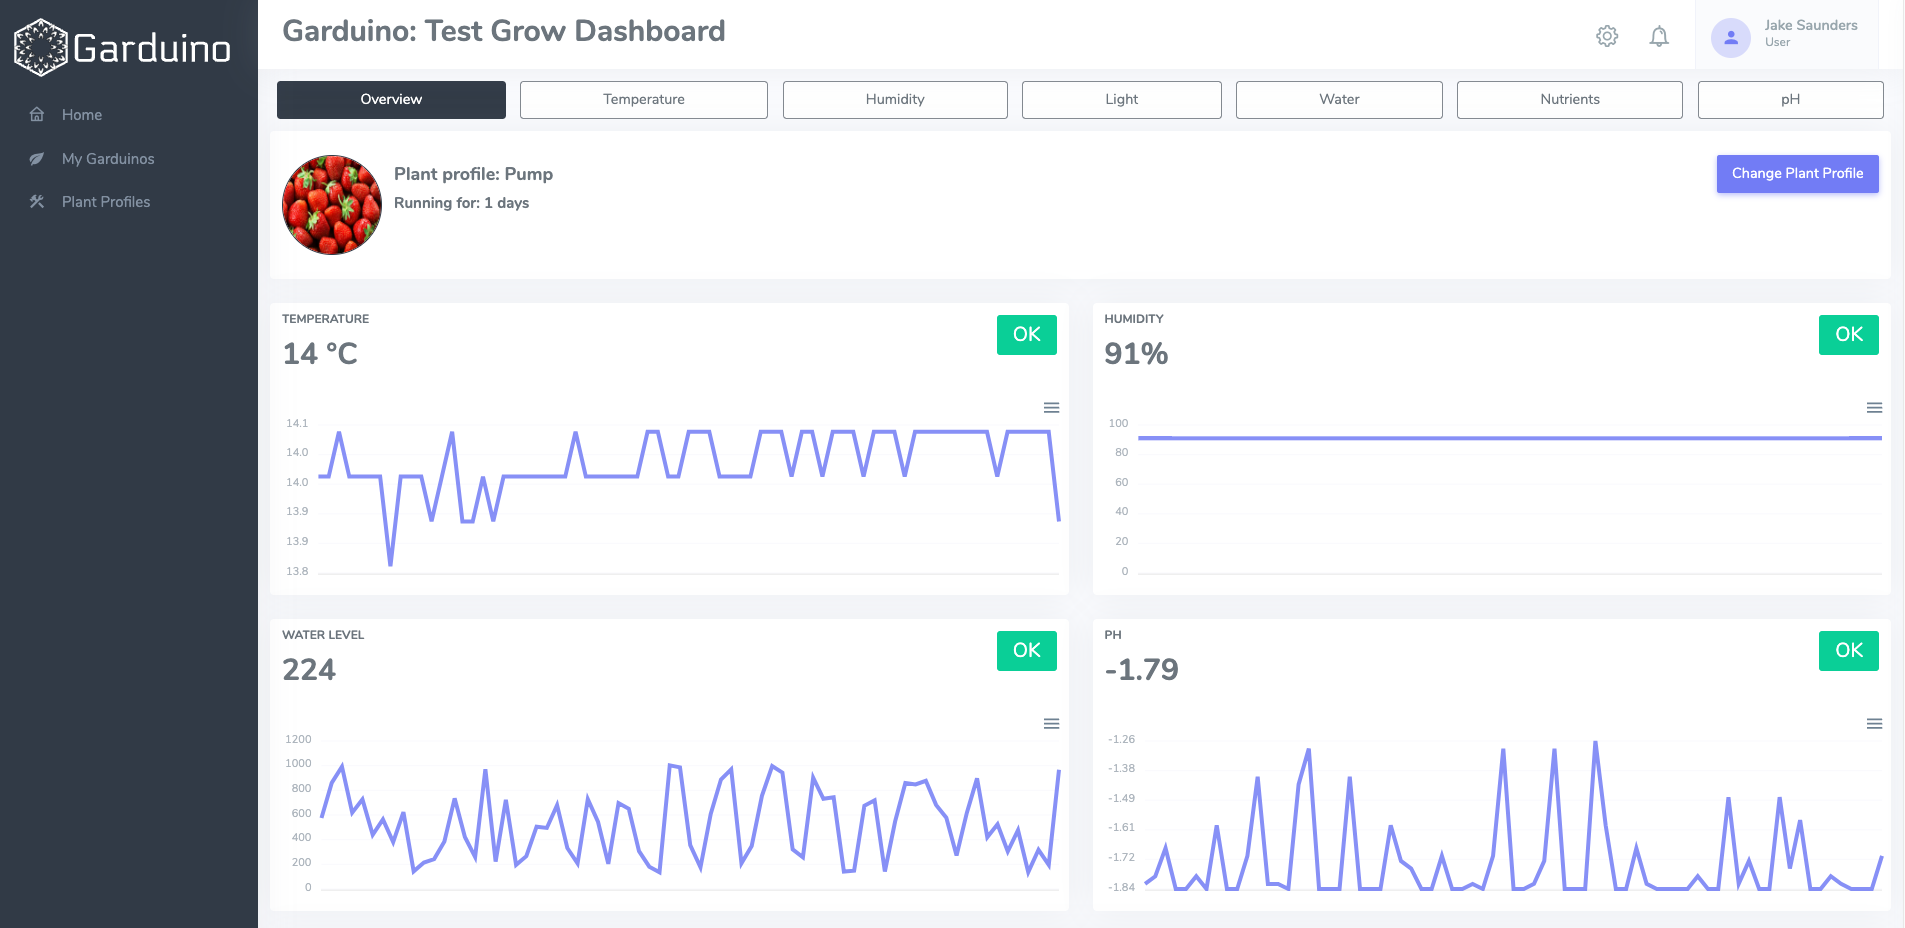
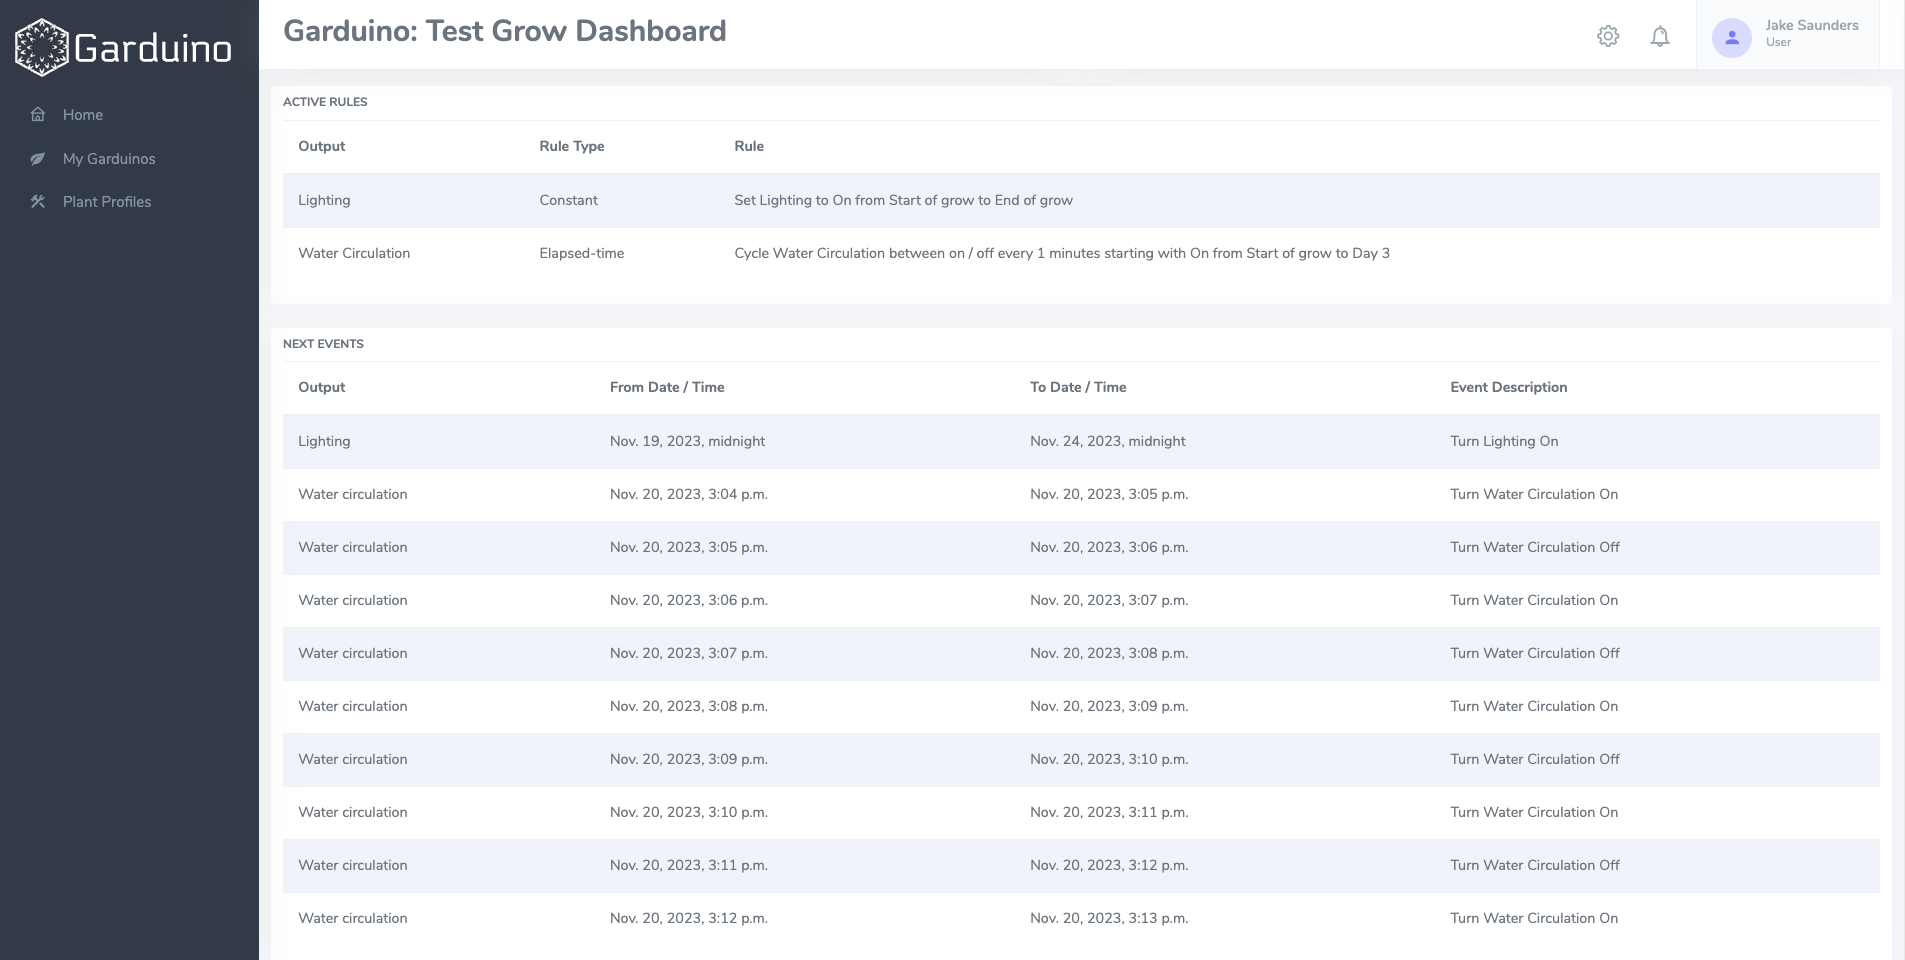
I’ve already built a good portion of the cloud app. Here’s a few screenshots of the garduino dashboard page.


There’s so much more I could have put in here, but I’d prefer to break it out into its individual parts to go into a bit more detail. Stay tuned!
